- Introduction
- Benefits of SSO for Partner Companies
- Accessing the SSO Configuration Menu
- Viewing and Managing Identity Providers
- How to Add or Edit an Identity Provider
- Audit Logs: Tracking Configuration Changes
- SSO Login Flow for Partner Companies
- Troubleshooting and Support
- Additional Resources
Single Sign-On (SSO) for Customer Portal User Guide
This guide is for ei3 SERVICE super-admins who want to offer a smoother, more secure login experience across ei3 applications by integrating Single Sign-On (SSO) authentication.
With SSO, users from our partner companies and their customers can sign in using their organization’s existing identity provider (IdP), such as Azure Active Directory – with no extra passwords needed. Partner company users will continue to access both the ei3 SERVICE and Customer Portal applications, while customer users will enjoy the same, streamlined access to the Customer Portal.
In the following sections of this guide, you will learn how to configure SSO, manage identity providers, and keep track of changes with audit logs, all from the SERVICE Admin menu. Whether you’re adding a new SSO configuration or troubleshooting login issues, this guide will walk you through each step to help you deliver a seamless user experience for your customers.
Benefits of SSO for Partner Companies
- Improved Security – Users authenticate through their company’s trusted identity provider, reducing the risk of less secure or forgotten passwords.
- Simplified Access – Employees can access ei3 applications with their existing corporate login, with no need to remember separate credentials.
- Reduced Password Fatigue – Fewer passwords to manage means a better user experience.
- Faster User Lifecycle Management – Access is controlled by the company’s authentication system, synchronizing changes automatically for granting or revoking user access to ei3 applications.
- Streamlined User Management – Super-admins can enable SSO company-wide for their own organization or for their customers’ entire organizations, reducing the need for manual user account maintenance.
- Compliance and Traceability – All SSO configuration changes are logged, providing a clear audit trail for IT and security teams.
Accessing the SSO Configuration Menu
To begin setting up Single Sign-On (SSO) for partner companies, you’ll first need to navigate to the appropriate section within the SERVICE Admin interface.
- Log in to the SERVICE application using your super-admin credentials.
- Only users with super admin privileges can access the SSO configuration settings)
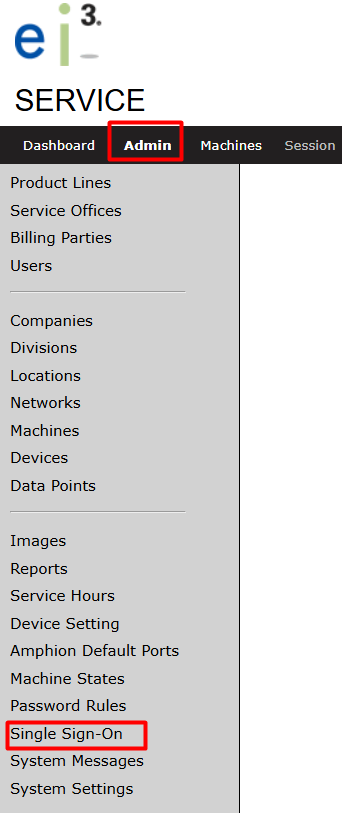
- From the main navigation menu on top, click on Admin, then select Single Sign-On on the left-hand section
- This will take you to the SSO Configuration page.
If you don’t see the Single Sign-On option, verify that you’re logged in with a super-admin account, or contact your system administrator for access.
- On the SSO Configuration Page, you will be able to:
- View all configured SSO entries
- Add new configurations
- Edit or remove existing ones
- Check the status (Enabled/Disabled) of each integration
Viewing and Managing Identity Providers
Super-admins can view, add, edit, or delete SSO configurations for each company. An SSO configuration requires information and credentials to be provided by each company to the super-admin, for integration setup.
Each column in the table represents a configured identity provider:
- Company Name: Identifies the company associated with the configuration; this is selected from existing companies in ei3 SERVICE.
- Name: The name of the SSO configuration; this is entered by the super-admin.
- Enabled: Indicates whether Single Sign-On is currently active for the company.
- Actions:
 Add: Create a new SSO configuration.
- Edit: Modify an existing SSO configuration.
 Delete: Remove a SSO configuration.

How to Add or Edit an Identity Provider
1. To configure SSO for a company, click Add or Edit, then fill in the following fields:
- Affected Users: Specifies the company associated with the configuration.This ensures that only users from this company will be able to use the SSO login with the chosen IdP. Select either the SERVICE partner company or one of its existing Companies by clicking on the respective radio button.
- Name: A name entered by you, to identify the company SSO configuration that you’re creating.
- Entity ID: Corresponds to the client name configured in the IDP. The Entity ID is essential for matching the request sent by ei3 to the IdP. The Entity ID is a unique identifier for the service provider that issued the SAML assertion, usually formatted as a URL. This ID is provided by your Identity Provider (IDP) and helps identify the entity within a federation.
- Single Sign-On URL: The URL of the IdP’s SSO endpoint, which the service provider will use to initiate the SAML authentication process with the IdP. This is the endpoint where the Service Provider sends authentication requests. This URL is used by the Identity Provider (IDP) to process SAML requests and initiate the Single Sign-On (SSO) process.
- Certificate: The X.509 certificate used by the IdP. This certificate is used to verify the authenticity of the SAML responses from the IdP.
- Consumer URL: The URL to which the identity provider should send the SAML response.This is the URL to which the Identity Provider (IDP) redirects users after a successful login, after authentication is complete. This is a required field and must be the URL used by the IdP.
- Enabled: Check this box if you want SSO to be enabled and active for the respective company.
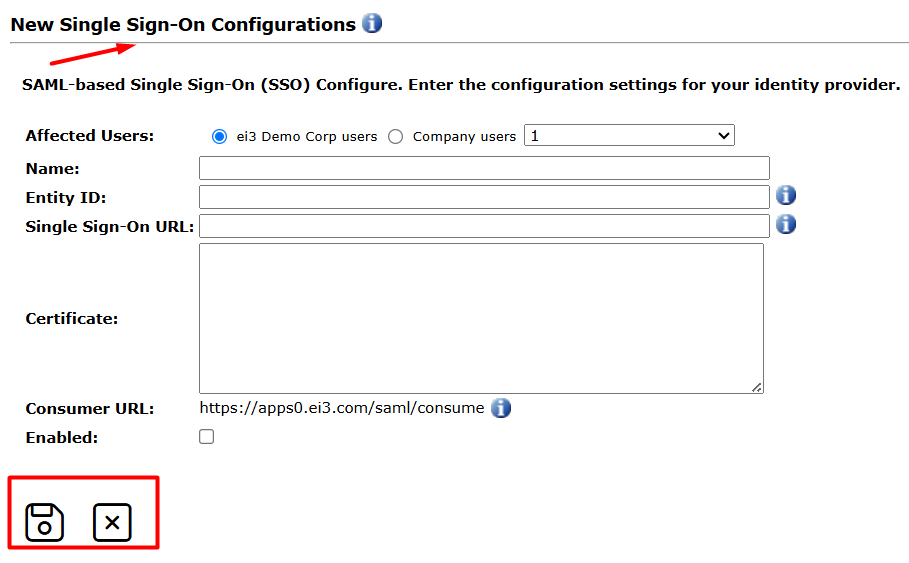
- Save the configuration:
- After entering the necessary information, click Save (floppy disk icon) to save the configuration.
The SSO configuration will be ready for use by the company’s users, and enabled if the Enabled checkbox is checked.
- Editing the configuration:
- Find the IdP you want to update in the list and click the Edit (✎) icon
- Update the necessary fields (e.g., Entity ID, SSO URL, Certificate).
- Click Save to apply the changes.
Audit Logs: Tracking Configuration Changes
To ensure traceability and compliance, all changes related to Single Sign-On (SSO) configurations are automatically logged in the Audit Log. This feature allows the super-admin user to review who made changes, what was modified, and when the changes occurred.
To access the Audit Log, click on the counter-clockwise clock icon:

Example SSO Login Flow
- Navigate to the ei3 Customer Portal Login Page
- Enter username and review/accept Privacy Policy
On the login page, the user inputs their user name.
ei3 uses this information to identify the user’s company and check if SSO is enabled for that organization.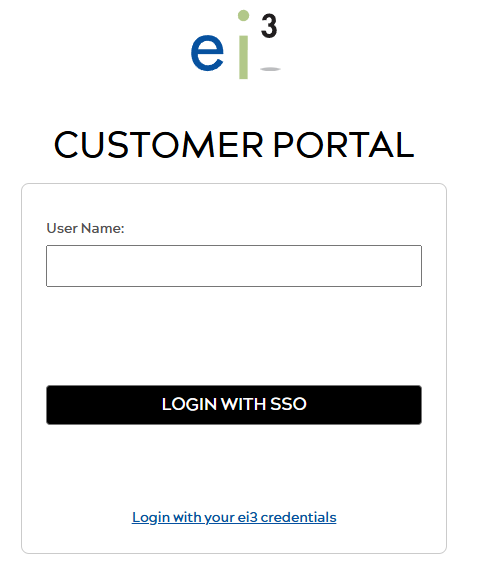

- User will be Automatically be Redirected to the Identity Provider (IdP)
If SSO is active for the user’s company, they are automatically redirected to their organization’s login page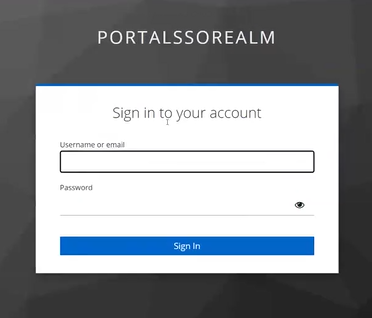
- User Authenticates through their Company’s login page
The user logs in using their existing corporate credentials. This step follows their organization’s standard security protocols, such as multi-factor authentication.
- Successful Authentication & Access Granted
Upon successful login, the user is then redirected to the ei3 Customer Portal and no additional login is required.
If SSO is not configured or active for a user’s company, the login will default to the standard ei3 authentication method and the user will need to enter a valid ei3 username and password to access the portal.
Troubleshooting and Support
|
Issue |
Possible Cause |
Suggested Action |
|
User is not redirected to their company login page |
SSO is not enabled for the user’s company, or the username in ei3 does not match the username in the user company’s IdP directory. |
Confirm the company has an active SSO configuration, and confirm that the usernames match. |
|
Login fails after redirecting to the IDP |
Incorrect SSO settings |
Double-check IDP configuration details with the partner company’s IT team. |
|
User sees a generic login page instead of SSO prompt |
SSO may be disabled or misconfigured. |
Ensure the “Enabled” toggle is checked in the SSO configuration. |
|
User has left the company but still has access |
Access not deactivated. |
Remind partner IT to terminate access through their IDP. |
