- Introduction
- Prerequisites
- General Information
- Entry Page for Machines that Have Shifts and Jobs
- Entry Page for Machines that Only Have Shifts
- Decimal Point Control
- Error Messages
Introduction
Entering scrap data and associating them with their respective categories and codes helps your business identify bottlenecks as well as accurately calculate your production quality. Its aim is to increase the quality of material produced resulting in a higher OEE value and therefore efficiency.
Prerequisites
Please note the following prerequisites in order to start your Scrap Tracking process:
- In order to access Scrap Tracking, users must have an active PRODUCTION subscription per machine participating in Scrap Tracking.
- Each machine must have an accurate Shift Schedule assigned to it.
- Scrap codes and categories must be created by Admins before entering scrap data. If there are no codes and categories, have an Administrator add them.
General Information
To access the Entries page of Scrap Tracking, where users can enter their data, navigate to PRODUCTION > Scrap > Entries, bringing you to a page resembling the image below.
![]()
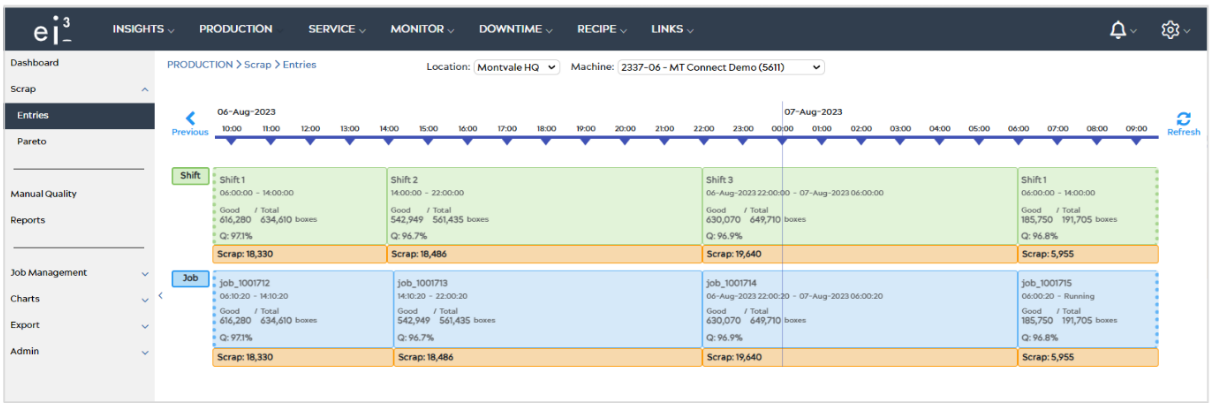
For an overview of the Entries page, visit this article: Entries Page Overview.
The Scrap Entries page is where you can enter scrap data for the selected time period (Shift / Job / No Job Time Periods)
There are three ways scrap can be adjusted:
- You can add scrap not reported by the machine. To do this, you enter scrap for a scrap code without reducing the unassigned scrap.
- You can assign existing scrap that was reported by the machine. For this, you reduce the unassigned scrap and add scrap to one of the scrap codes.
- You can convert any reported scrap back to good material. To do this, you reduce the quantity of scrap without adding a corresponding amount back to any other code. This will increase the quantity of good material.
Entry Page for Machines That Have Shifts and Jobs
To enter scrap data, first you must navigate to the 24 hour time period that contains the desired shift or job for which the scrap data is relevant. To navigate to different 24 hour periods use the previous ![]() and next
and next ![]() arrows on the timeline to go backward and forward in time.
arrows on the timeline to go backward and forward in time.
Note, in a future release we will be adding more navigation tools here to search for a particular date or job.
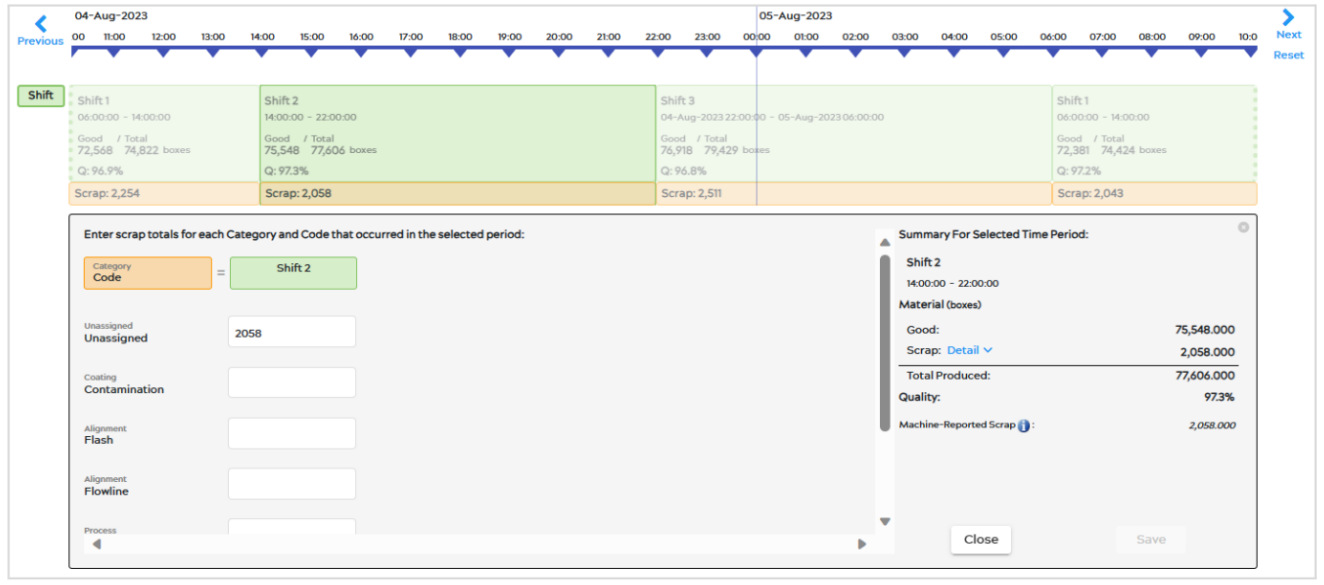
Next, select the desired time period by clicking on the Shift or Job in the 24-hour period displayed. This will highlight the section for that time period, and an entry panel window displaying the scrap information for that period will become visible. You can make a selection in either the shift row or the job row, to find the time period of interest. For example, you can select a job that encompasses many shifts, a shift that encompasses many jobs, or a time period between jobs if that occurs. The entry panel that becomes visible will have all the relevant shifts and jobs for the time period of your selections.
Note:
- In any time period in which no material was produced by the machine, scrap data may not be entered.
- In any time period in which material was produced and scrap data may be entered, the system will not allow more scrap material to be reported than was produced during the time period.
Entry Panel Breakdown
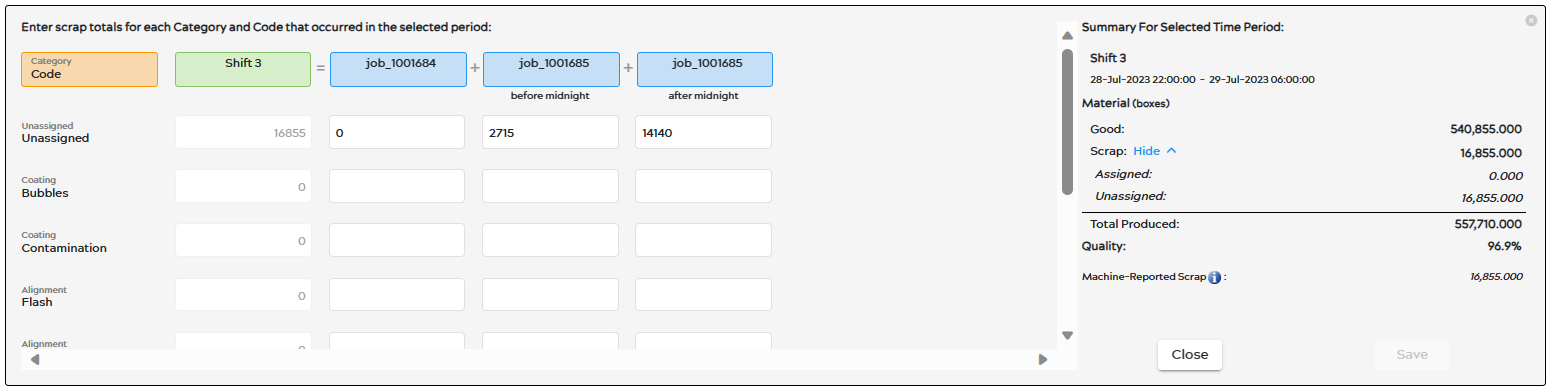
The scrap entry panel is divided into columns with a section for scrap summary.
Scrap code column
- The first scrap entry row is the Unassigned code which is always present even if there are no scrap codes defined.
- After the Unassigned code, the scrap codes are ordered alphabetically and are listed with their respective scrap category in smaller text above the code name.
- Inactive scrap codes will not appear within the list of codes in the entry panel.
Shift and Job Time Period columns
- The second column represents the selected Shift or Job time period and is used to display the sum of user-entered scrap quantities for all of the individual shift or job time periods that collectively comprise the overall selected time period by the user. You cannot enter data into this column, and the sums will appear in gray font.
- The Shift and Job names are shown in the first row of the columns. The names are truncated if they are too long but include a hover-over with the full name. Jobs are shown in blue, and shifts are shown in green.
- Only positive numbers or zeros can be entered as scrap values. In order to reduce the quantity of previously reported numbers, enter a smaller positive number.
- If a selected shift or job crosses midnight, the user will be required to enter data separately for the shift or job before midnight and after midnight.
- The scrap entry panel will include vertical and horizontal scrollbars to scroll the list of scrap codes and if needed to scroll the list of shift or job columns. The number of columns will match the number of shifts or jobs that correspond with the selected time period.
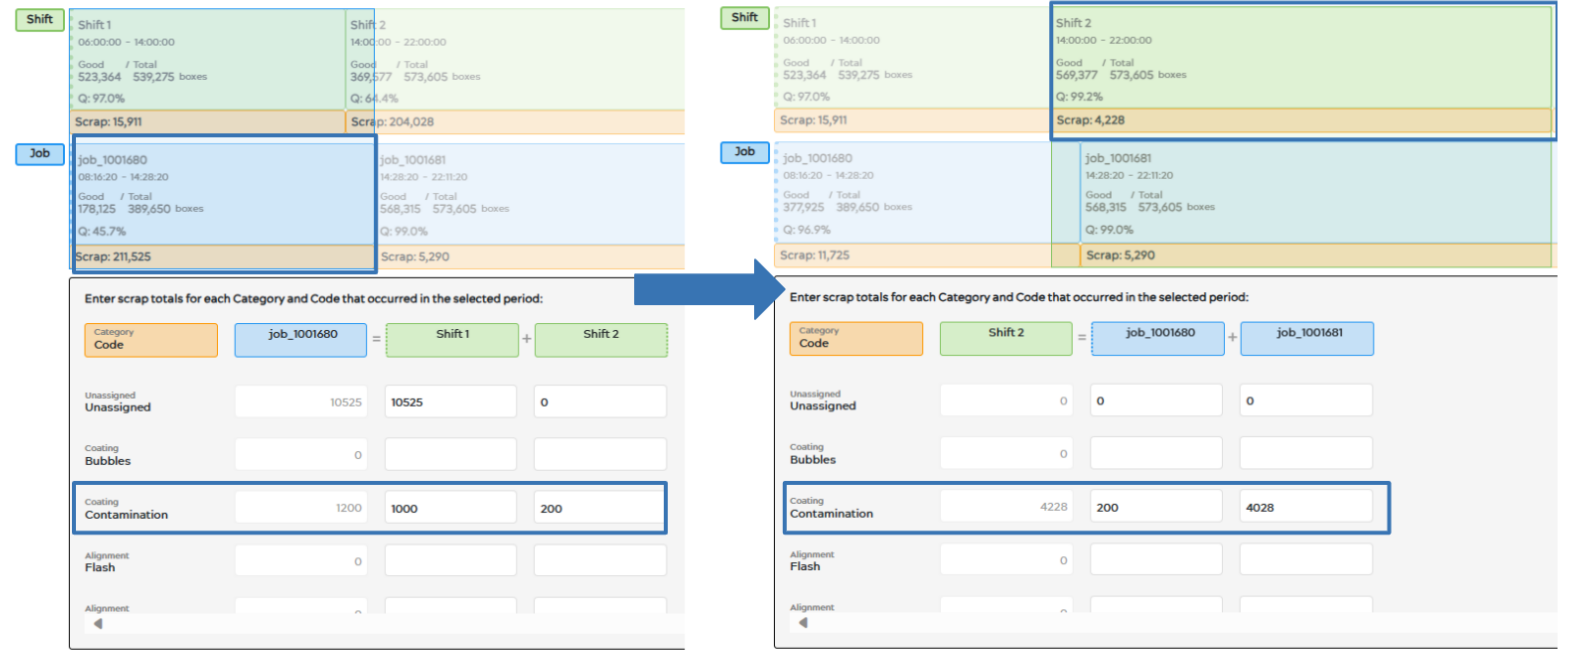
- When entering scrap data, the total scrap quantity for the selected overall job or shift time period is divided up between the various shifts or job segments within the overall period. The system will track and record that relationship for each individual scrap code.
- As you enter scrap values into each shift or job segment, these values will be summed in the total amount for that code for the entire selected time period, while the system will still recognize how much scrap you entered in a particular box.
- In the example below, job_1001680 was selected, encompassing a portion of both Shift 1 and Shift 2. Next, 200 units of scrap were entered for Shift 2 under the code “Contamination” and saved. Next, when selecting the Shift 2 time period on the timeline, there are 2 jobs occurring in this shift, and the scrap data previously entered in job_1001680 is shown. As you can see, job_1001680 has a total of 200 scrap boxes assigned the Contamination code.
Scrap Summary Section
The scrap summary section on the right side of the scrap entry panel includes:
- The shift or job name of the selected time period, which is truncated if the name is too long.
- The start and end date times of the selected time period.
- The machine’s production units are in parenthesis next to “Material”.
- The machine’s total good material for the selected time period, which changes based on the user-entered scrap data.
- The machine’s total unassigned scrap value for the selected time period, which changes based on the user-entered scrap data.
- The machine’s total assigned scrap value for the selected time period, which changes based on the user-entered scrap data.
- Total Produced is the total material produced as reported by the machine in the selected time period. This value cannot be edited by a user, and it will never change for a time period in the past. During a current shift or job time period, this value will change as the machine reports more material being produced.
- The Quality, which is the machine’s good material divided by the machine’s total material produced.
- Machine-Reported Scrap shows the amount of scrap (bad) material reported by the machine. This value cannot be edited by a user, and it will never change for a time period in the past. During a current shift or job time period, this value will change as the machine reports more scrap material has been produced. Hovering over the info button next to this will reveal a description of Machine-Reported Scrap.
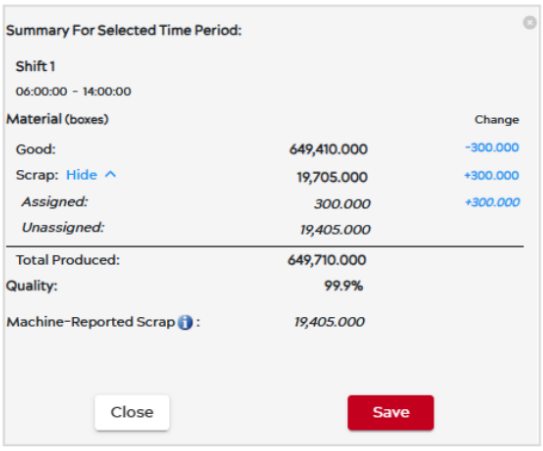
- A column named Change will appear when a user enters scrap data. The numbers shown in this column will show the impact of the data entered by the user before saving the entries.
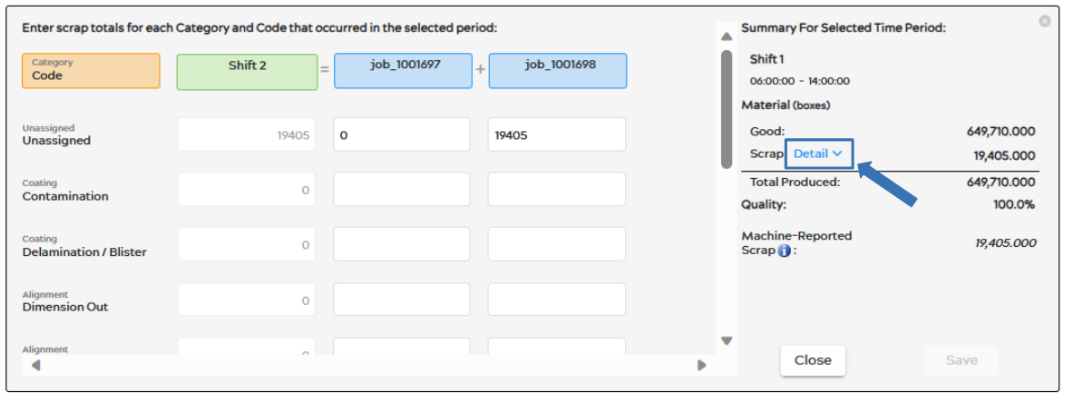 The image above shows an example of what the entry panel would look like upon selection of a shift that encompasses two jobs. The left-hand side of the panel is where you can enter scrap data, and the right-hand side shows the Summary Section. When clicking the blue Detail button next to the row labeled “Scrap”, the totals for Unassigned and Assigned scrap will become visible, as shown in the image below. You can select Hide, to hide these details whenever you wish as shown in the screenshot below.

When entering scrap data into the left-hand side of the panel, the rightmost column of the Summary section, named Change will update. The image below provides an example of how this column tracks changes before they are saved by the user.
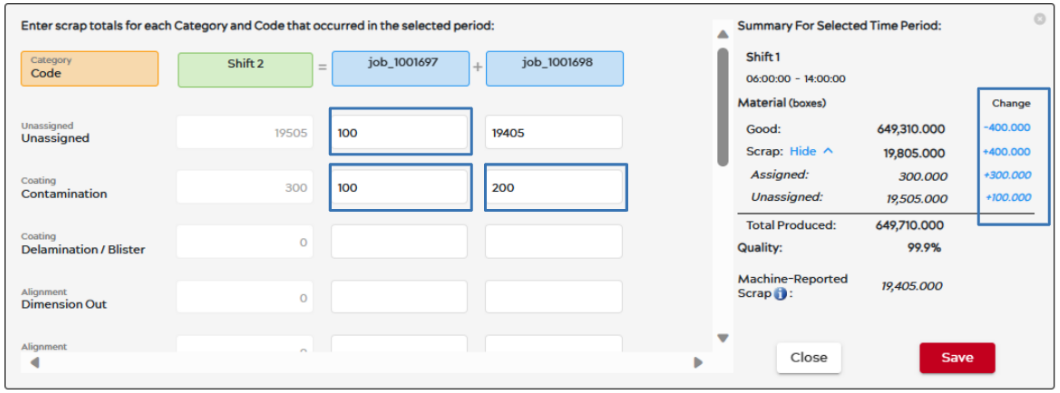
As seen in the example image above, there were 3 changes made to the scrap entries. In the first job, 100 boxes of scrap were added to Unassigned and 100 to the first code Contamination. For the second job, 200 boxes of scrap were added to the first code Contamination. Therefore, a total of +300 boxes were added to the Assigned scrap, and +100 to the Unassigned scrap. These changes appear as pending changes in the summary section. The row labeled Scrap sums the Assigned and Unassigned changes to show the total changes made to scrap (in this example +400). The Good Material row shows a total change of -400 since a total of 400 scrap boxes were added to the previous amount, resulting in a reduction in Good material so that the Total Produced material does not change.
When all entries have been made, select the Save button ![]() when finished.
when finished.
Selection of a Job Time Period
The image below shows what happens upon selection of a Job (in blue). Note that machines that do not have Job tracking set up in ei3 will not show any jobs on the Entries page.

Selection of a Shift Time Period
Upon selection of a Shift (in green), the entry panel will appear as seen below, with blue colored job segments presented that correspond with the selected shift.
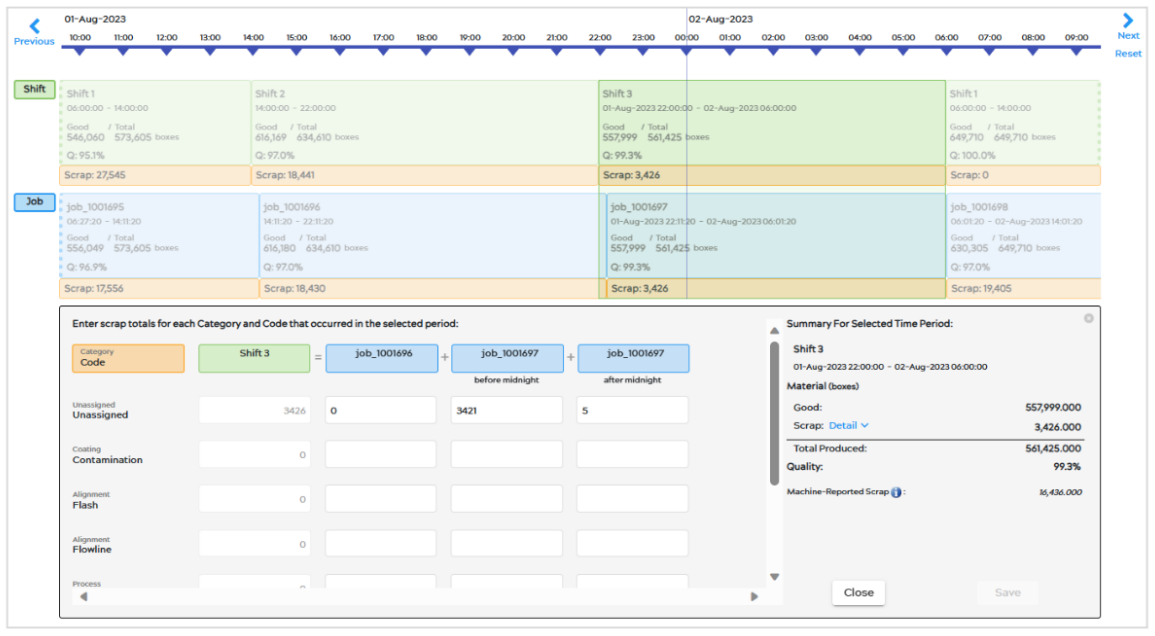
The left-hand side will again show the Codes with their associated Categories, and here the entry boxes correspond with the jobs that were run during the selected shift. Now, the sum of the scrap values entered for each relevant job (in blue) will be shown in the column for the selected shift (in green). The contents within the entry panel are the same as the details listed above.
Once again, the impact of entered scrap data will be shown in the Change column until the entries are saved. When all entries have been completed and confirmed, select the save button ![]() when finished.
when finished.
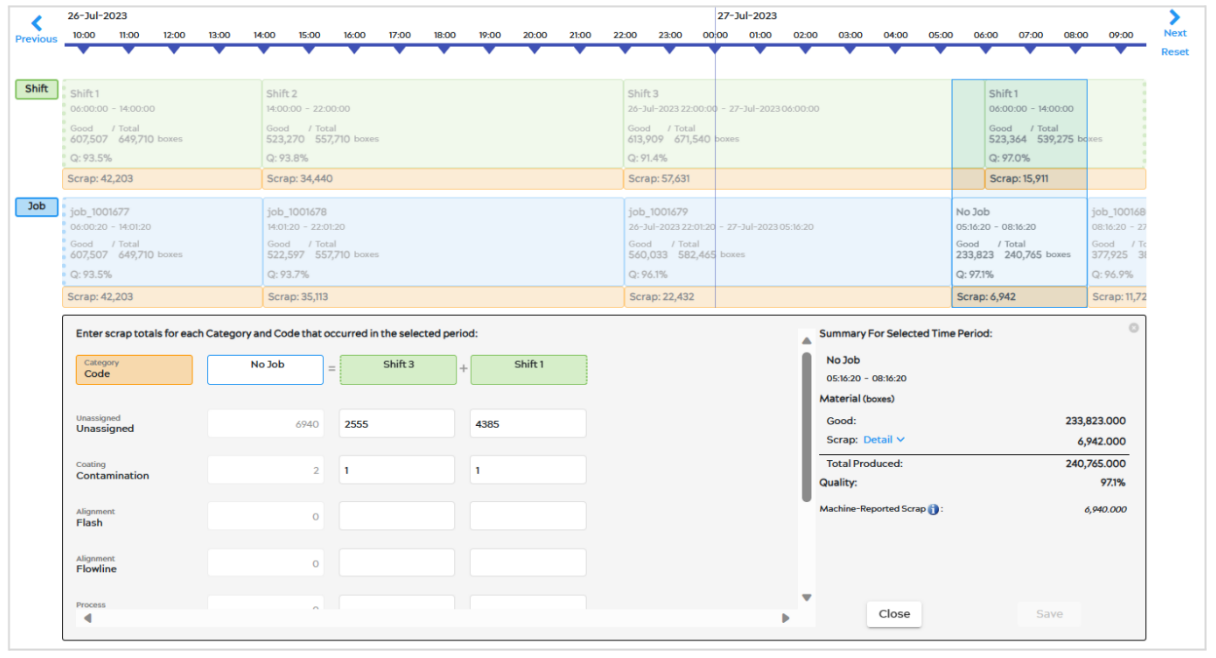
Selection of a “No Job” Time Period
A No Job time period occurs in the time periods between jobs, when one job ends but the next job has not yet started. In some cases the machine may be running and producing material during a No Job period, and for these cases scrap data may be entered.
The No Job time segments are located in the job bar, with the heading “No Job” in a white segment. Upon selection of a No Job Time Period, the entry panel that becomes visible works the same way as selecting a Job (read this above section for details on how this entry works).
Once again, the impact of entered scrap data will be shown in the Change column until the entries are saved. When all entries have been completed and confirmed, select the save button ![]() when finished.
when finished.
Entry Page for Machines that Only Have Shifts
Not all machines have job tracking set up in ei3, and machines with job tracking may not have jobs running all the time. In this case, only Shift time periods will be displayed under the timeline, as seen below.
Upon selection of a shift time period, the entry panel will appear much simpler than if there were also jobs. Instead of summing the scrap in multiple jobs for a shift, you simply have to enter the amount of scrap for the shift associated with each code. The Summary section (right-hand side of the entry panel) works the same as previously mentioned.
Once again, the impact of entered scrap data will be shown in the Change column until the entries are saved. When all entries have been completed and confirmed, select the save button ![]() when finished.
when finished.
Decimal Point Control
When entering scrap data, the default decimal place is 0, meaning all scrap data that is entered, will have no decimal places and are shown as integers. The allowed decimal places in scrap data can be changed globally for all machines in the site, or for all machines in a particular Product Line. If you would like to add decimal places to scrap entries, please contact care@ei3.com.
Error Message
If the amount of scrap entered exceeds the total amount of material, an error message will appear, letting users know they must adjust their entries.
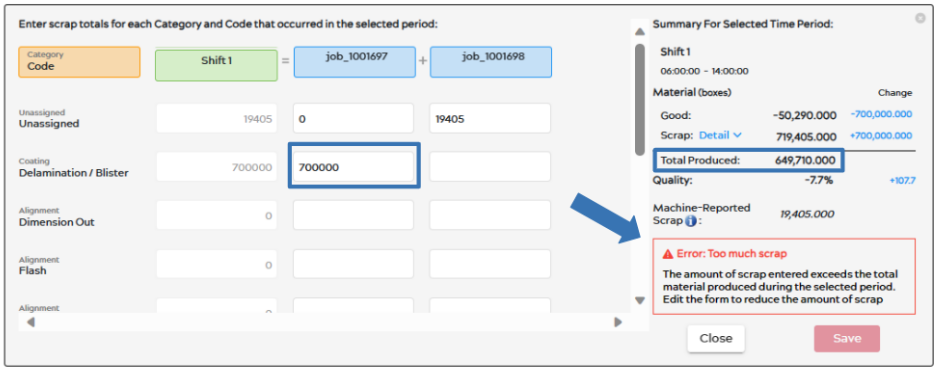
As you can see in the image above, 700,000 units of scrap were entered, but the total amount of material produced by the machine was only 649,710. Since it is impossible to have more scrap than material produced, the error message at the bottom of the totals section appeared to let you know you must adjust your entry to reduce the amount of reported scrap.
