Introduction
The Entries page of Scrap Tracking is where you can assign Codes to Scrap that are labeled as Unassigned by the machine. This will then associate Scrap with particular Codes and Categories, which is very useful for documentation and Pareto Analysis.
Prerequisites
Please note the following prerequisites in order to start your Scrap Tracking process:
- In order to access Scrap Tracking, users must have an active PRODUCTION subscription per machine participating in scrap tracking.
- Each machine must have an accurate Shift Schedule assigned to it.
- Scrap codes and categories must be created by Admins before entering scrap data. If there are no codes and categories, have an Administrator add them.
Navigating the Entries Page
To access the Entries page of Scrap Tracking, click on PRODUCTION > Scrap > Entries, bringing you to a page like the image below.
![]()
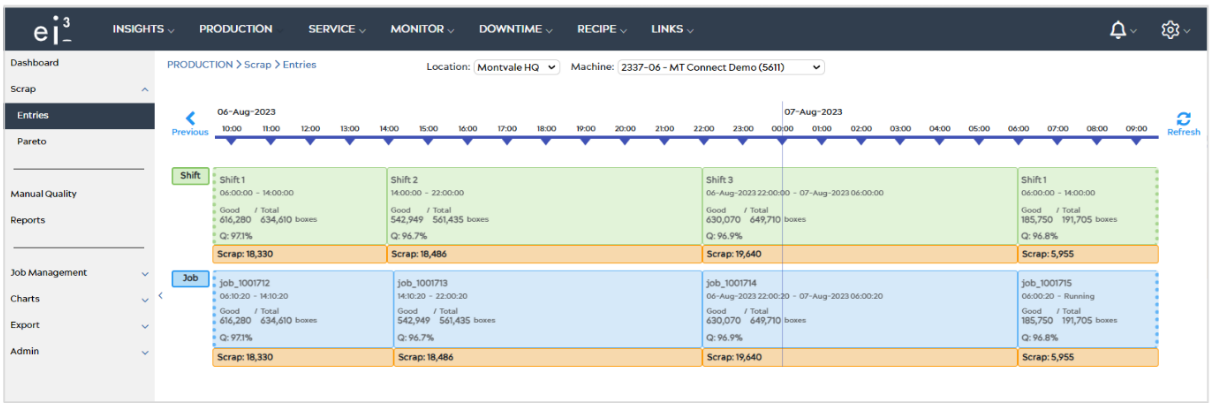
At the top of the page, you can see Location and Machine Selector drop-down bars. These selectors allow you to easily choose a different location and/or machine when viewing or entering scrap data.
Timeline
The bulk of the Scrap Entries page is the timeline. The timeline allows for seamless navigation back and forth in time to previous shifts and jobs and also lets you select the current shift and job for entries.
- The timeline covers a 24-hour period
- The timeline is divided into one-hour segments indicated by the tick marks
- The date shown on the timeline is in the machine’s local time
- The timeline includes the Previous, Next, and Refresh actions to navigate back and forward in time.
- The Previous arrow
 takes you back 24 hours at a time
 - The Next arrow
 takes you forward 24 hours at a time but is only visible when you have clicked the previous action and are viewing the previous 24 hours.
 - To Reset the timeline to its original position (current time), select the
 icon underneath the Next arrow.
 - The Refresh icon
 shows when the user is viewing the current 24 hours. Clicking it will refresh the page. Note that the page will not automatically update if not refreshed.
- The Previous arrow
If your machine has both shifts and jobs, then underneath the timeline there will be two bars, Shifts on top, and Jobs on the bottom. Each bar has separate “Time Periods”, where all the relevant information for that particular Shift or Job resides. They are separated into selectable segments.
Shift Time Periods
All machines must have shifts set up before using scrap tracking. Shift Time Periods always appear on top of the job Time Periods on the scrap entries page. They are colored green.
- Selecting the shift time period highlights the shift and causes the scrap entry section to become visible.
- The shift time period includes
- The shift name
- The shift start date time and end date time
- The machine good and total material for the selected time period/shift
- The machine’s production units.
- The Quality (shown as the letter Q), which is the machine’s Good material divided by the machine’s Total material
- The machine’s bad material (with the label Scrap). The bad material/scrap is the difference between the machine’s good material and the machine’s total material.
Job Time Periods
Please note that not all machines may use jobs. If there are no jobs, the scrap entry page would only show the timeline, shift Time Periods, and the scrap entry when a shift is selected. If this is your case, disregard this information and please see this article.
If you do use jobs, there will be Job Time Periods, similar to shift time periods, located below the shifts, as seen in the previous image. Job time periods will be colored blue.
Each job time period includes:
- The job name, which is truncated if it is too long to fit in the display window.
- The job start date time and the end date time
- The machine’s good and total material for the selected time period/shift
- The machine’s production units.
- The quality (shown as the letter Q), which is the machine’s Good material divided by the machine’s Total material
- The machine’s scrap (also called bad material). The scrap is the difference between the machine’s good material and the machine’s total material.
No Job Time Periods and Partial Segments

The No Job time period represents the time between jobs where the machine may have been producing material. The same data shown in a job time period is also shown in a no job time period, although the no job segments are represented by a white time period, as seen above.
Partial segments occur when a job or shift starts before or ends after, the selected time range, or is still in the midst of being tracked. Partial segments are represented with a dotted line, as seen above.
Entry Panel
Selecting a Shift, Job, or No Job Time Period will highlight the section for that entire time period, and an entry panel window displaying the scrap information becomes visible, as seen in the figure below.
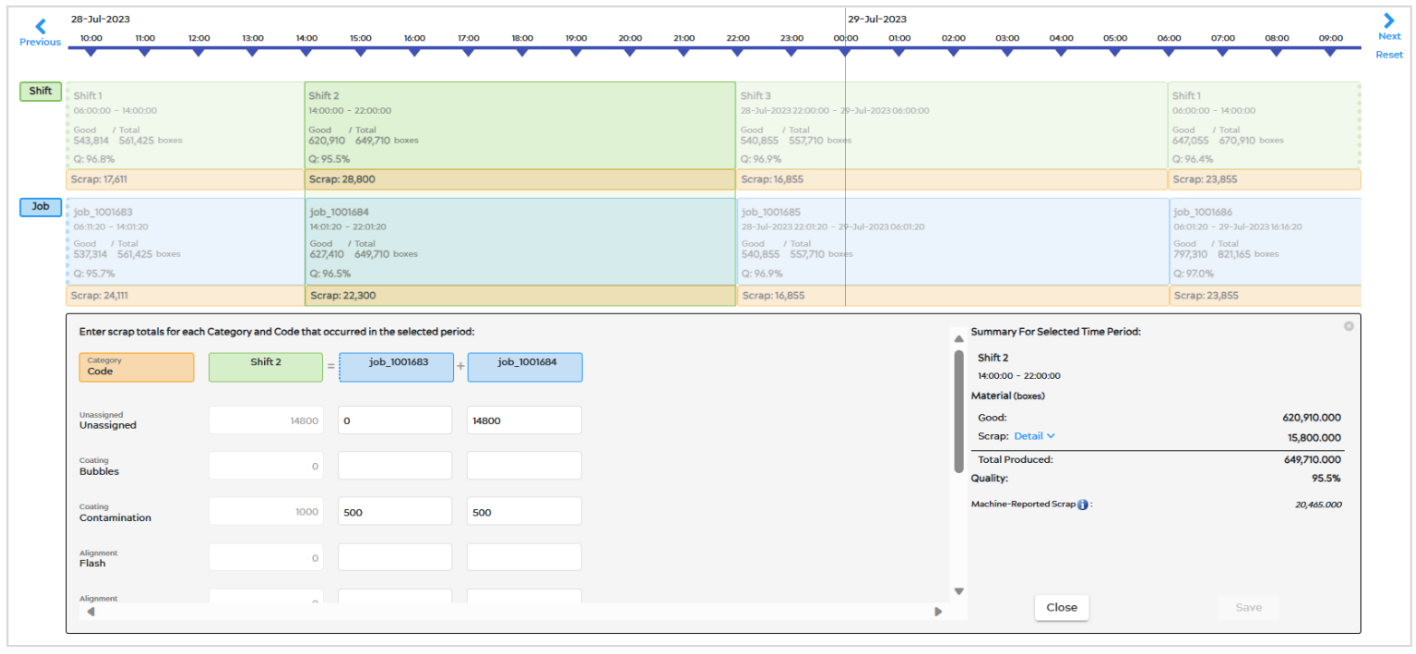
The entry panel window lets users enter scrap totals for each Scrap Code that occurred in the selected period. The Entry panel shows:
- List of scrap categories/codes
- Column for selected Shift/Job
- Column(s) for concurrent Shift(s)/Job(s)
- Scrap summary Section including Material counts (Total, Scrap Assigned, Scrap Unassigned, Good, Quality, and Machine-Reported Scrap)
- Any changes made when entering data
- Save/Cancel
Users can input the amount of material in each reason for the scraps, see this article to learn more about entering scrap data.
