Product Activation – Overview
Product activations allow specific machines access to certain products. With no product active, a machine cannot collect data, track downtime, or have access to any other features available with data collection.
Activating products is done through the SERVICE application, on the machine configuration page. If you don’t have access to SERVICE, contact us to get products activated on your machines.
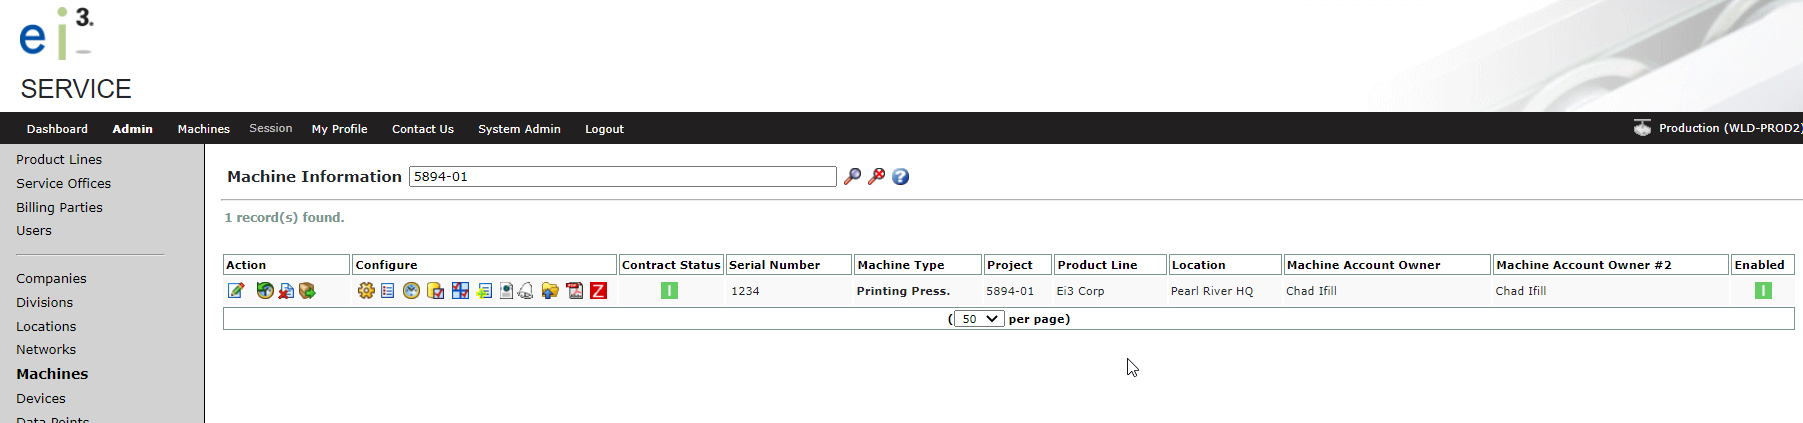
In the SERVICE application, from the Admin tab:
- Find your machine: click on the Machines tab and search for the machine, OR drill down from the company / network the machine is on.
- Click the
 icon to open the machine’s Product Activations page.
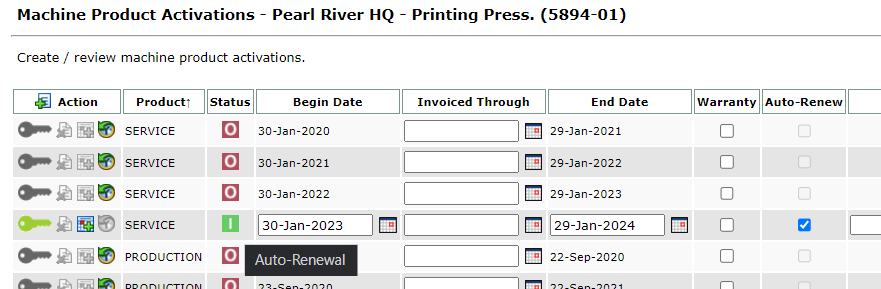
The Machine Product Activations page shows the complete product activation history for the selected machine. Product name, status, activation date, and billing information are all displayed.
Product Activation Symbols
There are four colors for product activation keys:
![]() Green key – The product is active on the machine.
Green key – The product is active on the machine.
![]() Red key – The product has not been activated yet.
Red key – The product has not been activated yet.
![]() Blue key – The product is set to pre-activation. (Its start date is in the future and will take effect on the date shown in the Begin Date field).
Blue key – The product is set to pre-activation. (Its start date is in the future and will take effect on the date shown in the Begin Date field).
![]() Grey key – The product has been deactivated, but is still displayed to show the complete product activation record for this machine.
Grey key – The product has been deactivated, but is still displayed to show the complete product activation record for this machine.
The Status icon displays an indicator showing the current product activation status:
![]() – The product is active.
– The product is active.
![]() – The product is inactive (deactivated).
– The product is inactive (deactivated).
![]() – The product is active but expiring in the next 90 days.
– The product is active but expiring in the next 90 days.
![]() – The product has not been activated yet.
– The product has not been activated yet.
How To Set Up Products
From the Machine Product Activation page, click the New ![]() icon in the Action menu.
icon in the Action menu.
When the page reloads, a new product item will appear in the list, with a red key ![]() icon displayed:
icon displayed:

Select the product you’d like to activate from the drop-down menu.
You can use the Calendar icons ![]() to open up a calendar pop-up and select a Begin Date and End Date for the product activation. Alternatively, dates can be typed into the text boxes.
to open up a calendar pop-up and select a Begin Date and End Date for the product activation. Alternatively, dates can be typed into the text boxes.
Select a Billing Party from the drop-down menu. If the billing party isn’t listed, contact us for support.
Click the red key to activate the product. The key color should change to green, signifying that the product is now active.
If this doesn’t work, make sure you have selected a valid Billing Party.
Auto-Renew
When enabled, Auto-Renew will automatically re-activate a product once its current active period ends.
Check the Auto-Renew box if you’d like the product to automatically update with a new product entry upon its expiration.
Hovering over a product activation which has Auto-Renew enabled will display a message to indicate as such. You can read more about Auto-Renew in this article.
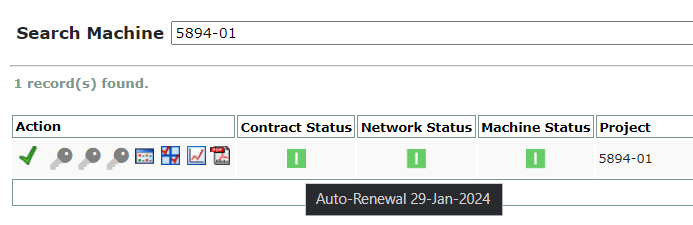
If a product is set up with Auto-Renew enabled, it is also indicated from the hover-over text in the SERVICE > Machines page:
Pre-Activating Products
For products which have not been activated yet or are currently active, it is possible to add a pre-activation row for that product.
Once a product has been added to the list and it either set to a green key ![]() or a red key
or a red key ![]() the Pre-Activate icon
the Pre-Activate icon ![]() will be available.
will be available.
Pre-activating a product will allow multiple entries for the product to be listed, each set out for a year from the previous end date. The entries will appear with a blue key icon ![]() to signify the status of the pre-activation.
to signify the status of the pre-activation.
- A copied activation row will only copy the Product and its Billing Party. The options for Auto-Renew and Warranty are unchecked by default.
- Once an existing active row reaches its end date, the active row will be deactivated and the next pre-activation row will become activated.
- Expired product activations and product activations with Auto-Renew checked cannot be duplicated in this way. The Pre-Activate icon
 will become grayed out for these entries.
